Full Stocks

Welcome to the Full Stocks project !
This project is a full stack web-application made in :
Backend

Frontend

Database


Deployment

Versioning

Useful links
Here you’ll find useful links for this project.
- Live Application ⚠️ Only on computer !
- Project source code on github
- Backend Sphinx documentation on github pages
- Swagger backend documentation on Swagger UI
What is Full Stocks ?
Full Stocks is a small project I made to play with Vue3. The application allows users to visualize stock price for a lot of available symbols. You can switch between raw value and performance, and compare multiple stocks at the same time. You can even switch the time frequency to the one that fits you the best. Try it now
Where are the data coming from ?
The data are fetched live from the Twelve Data API.
It uses my own API key and I only have the basic plan which allow me only 8 requests per minute.
With that in mind, I designed the application to be the less-demanding as possible on the Twelve Data side, while being the most up-to-date data possible. To do so, there is a SQL Database which store data from the Twelve Data API. 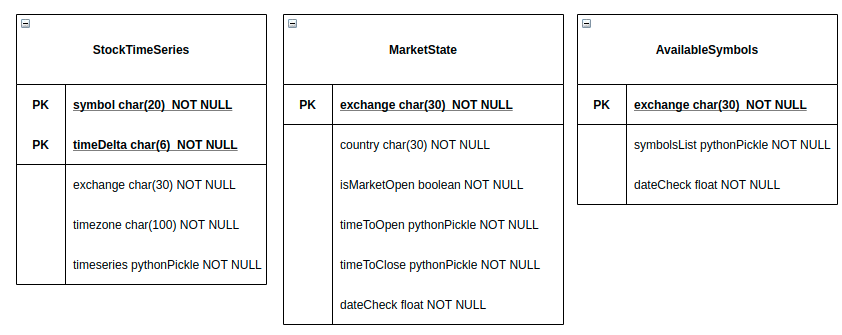 The data base structure
When the application needs stock information for a given symbol and a given time interval, the backend will check first if such data already exists in the database, and if it’s up-to-date considering the given time interval. If so, it will requests Twelve Data because there will be no new ones available anyway and therefore not use unnecessary API credits. If data is not up to date, the backend verifies if the associated market exchange is open. If so it will requests new data from Twele Data API, otherwise it will keep with the stored data in the database.
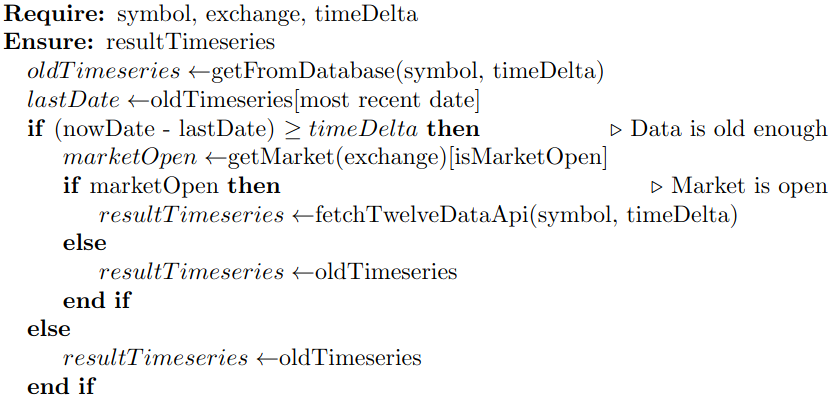 The pseudocode of the timeseries update algorithm
With this architecture, the application can retrieve and use always up-to-date data without using unnecessary API credits !
The backend
The backend is made in Python 3.11, with the Flask Framework. I implemented a REST API to get, create and update stocks time series, market information and available symbols list.
The backend serves 3 purposes :
- Connect with Twelve Data API to retrive what the data the application needs.
- Manage the SQL database where the data are stored.
- Deliver the data to the frontend through the given endpoints.
The backend architecture is fairly simple :
1
2
3
4
5
6
7
8
9
10
11
12
13
14
15
16
17
18
19
├── app.py                                # main application file
├── config
│   ├── log_config.ini                    # config file for the logs
│   └── twelvedata_api_info.json          # config file for the twelve data api section
├── config.py                             # config file of the application
├── Dockerfile                            # Docker file for easy deployment
├── docs                                  # Sphinx documentation folder
├── logs                                  # Logs folder
├── pytest.ini                            # Pytest configuration for unit testing
├── requirements.txt                      # Package requirements
├── src                                   # Main functions of the application
│   ├── exceptions_twelvedata_api.py      # Exception handler for the API
│   ├── request_twelvedata_api.py         # Requests functions for Twelve Data API
│   ├── stock_stats.py                    # Statistical functions
│   └── utils.py                          # Useful functions
└── tests                                 # Tests of the main functions
    ├── test_request_twelvedata_api.py
    ├── test_stock_stats.py
    └── test_utils.py
I did not include the config.py file in the github repo to keep my API key secret. If you want to use the application locally, you will need to create the config.py file to make the backend run :
1
2
3
4
# config.py
API_KEY = "my_api_key"                  # Change with your own Twelve data API key
API_PLAN = "Basic"                      # Change for your subscribed plan
FRONTEND_URL = "http://localhost:8080"  # Your front-end URL, change as necessary
Install the dependencies :
1
pip install -r requirements.txt
Finally, run either
1
2
flask run      # dev server
python app.py  # prod server
It will create a db.sqlite file, containing the database.
The backend is now running, you can request it from the frontend or from Swagger UI/Postman.
Testing
For quality consistency purposes, the backend is well covered by tests.
Testing is a key component for every software project, as it ensures that parts of your code are still working when another part is modified. On the other hand if something breaks, you can investigate very quickly where is the breaking piece. Finally testing allows you to make sure previous issues you solved (particular cases, typing issues) did not break without you knowing !
I used two testing libraries : pytest and doctest.
Pytest requires a pytest.ini file :
1
2
3
4
5
# pytest.ini

[pytest]
python_files = test_*.py
testpaths = tests
Pytest will run test files found according to your configuration. A test file looks something like that :
1
2
3
4
5
6
7
8
9
10
# src/foo.py
def foo_function(a: str) -> str:
  return a

# tests/test_foo.py:
from foo import foo_function

def test_foo_function():

  assert foo_function("foo") == "foo"
I can easily check if my tests work by running the pytest command line :
1
2
3
4
5
6
7
8
9
10
11
12
13
$ pytest
========================= test session starts =========================
platform linux -- Python 3.11.3, pytest-7.3.1, pluggy-1.0.0
rootdir: /path/to/app/backend
configfile: pytest.ini
testpaths: tests
plugins: typeguard-4.0.0, requests-mock-1.10.0
collected 8 items

tests/test_request_twelvedata_api.py ..                                     [ 25%]
tests/test_stock_stats.py ....                                              [ 75%]
tests/test_utils.py ..
All tests passed !
Doctest serves another purpose. While pytest is used to create exhaustive tests, doctest aims to ensure that the tests in your documentation would run correctly when used in a real Python environnement.
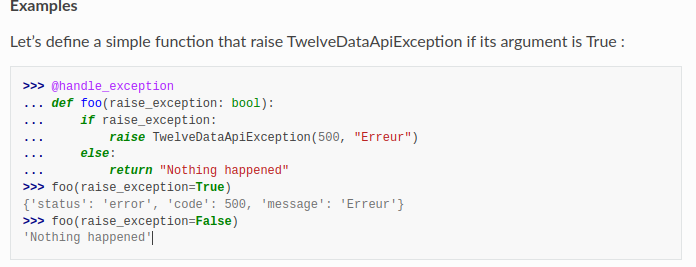 This example comes from the Sphinx documentation of the project
Using the module doctest from Python, you can easily check if your test actually works :
1
2
3
4
5
6
7
8
$ python -m doctest src/exceptions_twelvedata_api.py -v
...
Trying:
    foo(raise_exception=True)
Expecting:
    {'status': 'error', 'code': 500, 'message': 'Erreur'}
ok
...
If you are interested to see the documentation of the backend source files, follow this link. It was made with Sphinx and is automatically created on push on the main branch ! (see CI/CD)
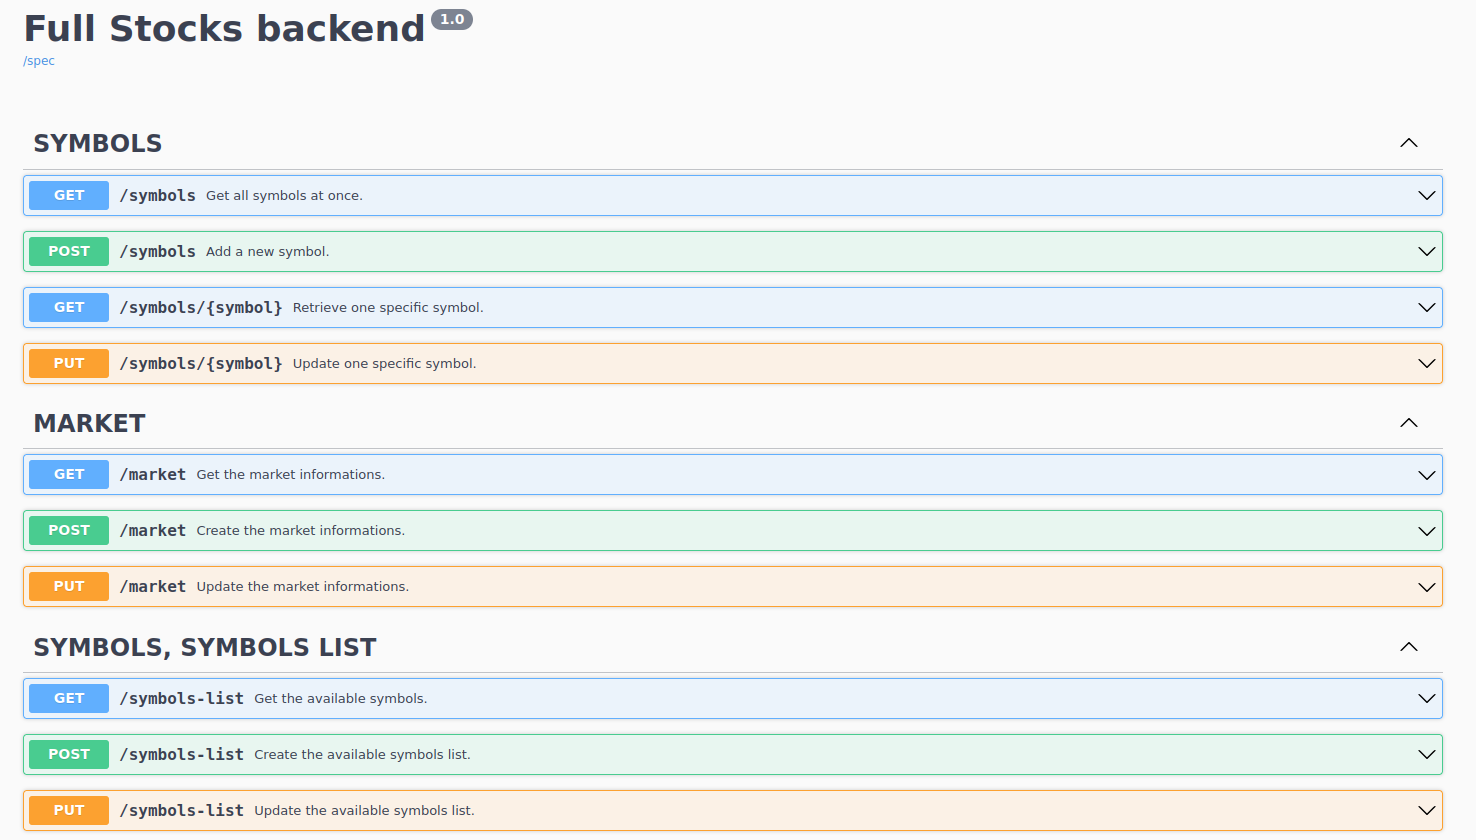
RESTful API
The backend implements a RESTful API. REST-based architecture allows requesting to access and manipulate web ressources by using a uniform and predefined set of rules.
The API follows these simple rules :
- Only GET requests retrieves data. If data does not exists, return code 204 (client can then decide to create it through POST)
- If POST requests create data, returns code 201 to informs client that it can retrieves data from the GET route. If data already exists, return code 200 (client can then decide to requests it through GET)
- If PUT updates data, returns code 200 to informs client that it can retrieves data from the GET route. If data does not exists, return code 204 (client can then decide to creates it through POST)
With this architecture, requestsing from client-side is really simple for each endpoint and demands few lines of codes.
You can see the backend API endpoints directly on SwaggerUI. It is a really useful tool to document APIs as well as testing them (for the last point however, I would recommend Postman instead)
 You can easily see the API endpoints
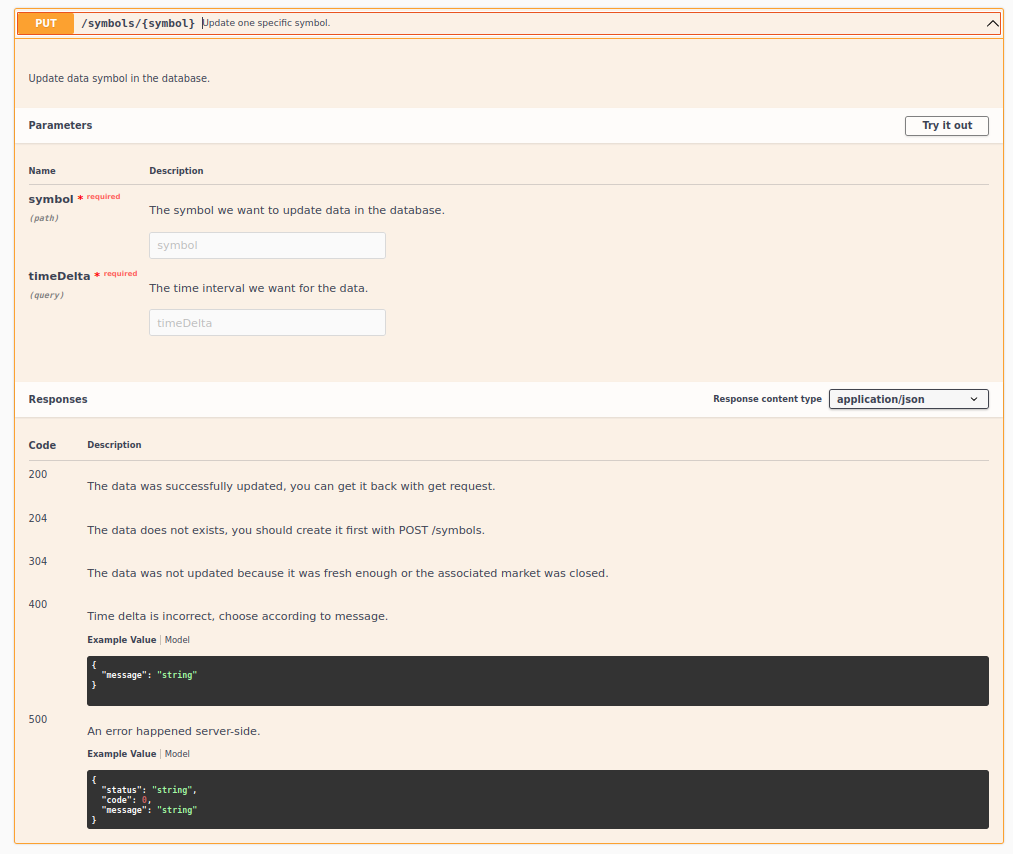 For each methods, you can have a details about parameters, responses and even try it live !
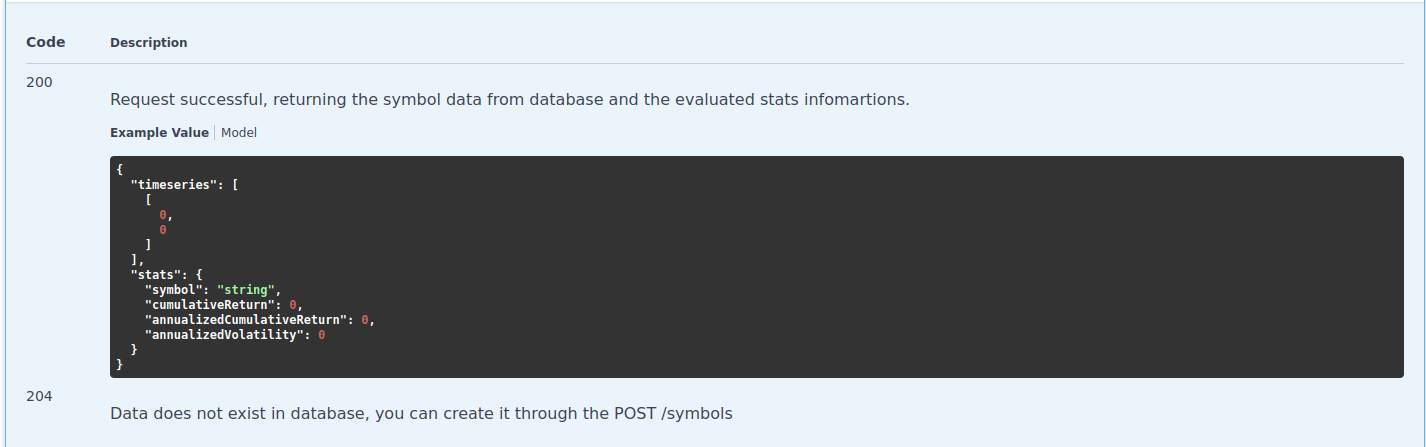 You can see the structure of the response, very convenient to use the result of the endpoints !
Swagger UI allow to document your API so that everyone can see how its working. If you need to use any of the endpoints, you have direct access to parameters and output data format.
You should however not it in production if you want to preserve the secrecy of your work. Mine being open-source however, I have no issues with that.
The backend is now ready to communicate with the outside world!
The Frontend
The frontend is made with the Vue.js 3 framework using composition API. The frontend part of the application is made for user-friendly usage of the backend works.
It serves 3 purposes :
- Visualize stocks values and performances
- Have access information about market state (open or close, and when it will change)
- Visualize stocks statistical informations
The frontend architecture of the application looks like this :
1
2
3
4
5
6
7
8
9
10
11
12
13
14
15
16
17
18
19
20
21
22
23
24
25
26
27
28
29
30
31
.
├── config.js                    # Config file of the application
├── Dockerfile                   # Dockerfile for the deployment
├── index.html
├── package.json                 # Packages needed
├── package-lock.json
├── public
├── README.md
├── src
│   ├── App.vue                  # Main Vue file
│   ├── assets
│   ├── components
│   │   ├── Header.vue           # Header component
│   │   ├── icons
│   │   ├── LineChart.vue        # Component for the stocks charts visualization
│   │   ├── MarketState.vue      # Component for the market state visualization
│   │   ├── SelectSymbols.vue    # Component for the symbol selection
│   │   ├── StatsTable.vue       # Component for the statistical informations
│   │   └── __tests__            # Test folder testing components
│   ├── docs
│   ├── helpers                  # Main functions
│   │   ├── fetchbackend.js      # Module to requests backend REST API
│   │   ├── __tests__
│   │   └── utils.js             # Utilities functions
│   ├── main.js
│   ├── router
│   │   └── index.js
│   └── views
│       └── HomeView.vue         # Main view
├── vite.config.js
└── vitest.config.js
Thanks to our REST-base architecture backend, all the scripts to connect to the backend is contained in one and only one function. Since every endpoints follow the same rules as defined previously, we can define a simple function :
1
2
3
4
5
6
7
8
9
10
11
12
13
14
15
16
17
18
19
20
21
22
23
24
25
26
27
28
29
30
31
32
33
34
35
36
37
38
39
40
41
42
43
44
45
46
47
48
49
50
51
52
53
54
55
// src/helpers/fetchbackend.js
import axios from "axios";
import apiUrl from "../../config";

/**
 * Fetch backend for data.
 * @param {string} endpoint Endpoint route
 * @param {string} method Method used
 * @returns {Promise} The promise result, allowing async usage
 */
function fetchBackend(endpoint, method) {

    return axios({
        method: method,
        url: apiUrl + endpoint,
    }).then((res) => {

        switch (method) {
            case 'get':
                switch (res.status) {
                    case 200:
                        // Data exists
                        return { "data": res.data, "status": "ok" }
                    case 204:
                        // Data does not exists
                        return fetchBackend(endpoint, 'post')
                }

            case 'post':
              if ([200, 201].includes(res.status)){
                // Data either exists or was created, get it back now
                return fetchBackend(endpoint, 'get')
              }

            case 'put':
                switch (res.status) {
                    case 200:
                      // Data updated
                      return fetchBackend(endpoint, 'get')
                    case 204:
                      // Data does not exists, create it
                      return fetchBackend(endpoint, 'post')
                }
        }
    }).catch((error) => {
            if (error.response.status == 304) {
              // Data was not update with put requests
              return fetchBackend(endpoint, 'get')
            } else {
                console.log(error)
            }
    })
}

export { fetchBackend }
A simplified version of the existsing fetchbackend.js, but the idea is here.
Now we can retrieves data from the server from any endpoint :
1
2
3
4
import {fetchBackend} from "./helpers/fetchbackend.js"

let appleData = fetchBackend("symbols/AAPL", "get")
let marketData = fetchBackend("market", "get")
Thanks to this simplification of the API requesting, you can have a cleaner and easier maintained code!
If something goes wrong during the backend api requests, notifications appears at bottom right to give insights of the issue :
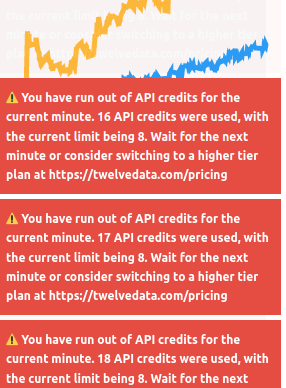 Too much API credits were used !
Testing
Just like the backend, you should (and must) test the code of your application ! For this part I used vitest, a framework to test javascript modules as well as Vue components.
Tests functions are stored in the __test__ folders. Lets write some test for fetchBackend function defined earlier :
1
2
3
4
5
6
7
8
9
10
11
12
13
14
15
16
17
18
19
20
// src/helpers/__test__/fetchbackend.spec.js
import { describe, it, expect } from 'vitest'

import { fetchBackend } from '../fetchbackend'

import axios from 'axios';
import MockAdapter from 'axios-mock-adapter';
import apiUrl from "../../../config";

describe('fetchBackend', () => {

    it('should work', () => {
        var mock = new MockAdapter(axios);
        const data = { "foo": 0 };
        mock.onGet(apiUrl + "market").reply(200, data)
        fetchBackend("market", "get").then(response => {
            expect(response).toStrictEqual({ data: { foo: 0 }, status: 'ok' })
        })
    })
})
Note that we were able to test this function without the backend server running. This is thanks to the axios-mock-adapter library. It allows to overwrite endpoints response for every request method. Here, for the endpoint “market”, it set the reply of get method to code 200 with data. This makes testing functions requesting outside ressources always possible and consistent.
CI/CD
CI/CD, for Continuous Integration/Continuous Development, is a key part to build robust applications. This is the part where you automate your testing routine and the deployment of your application.
For the CI part, I used Github Workflow to automate testing. There are several workflows currently active on the repo :
- Backend unit test with Pytest
- Backend unit test with doctest
- Frontend unit test with Vitest
- Build the Sphinx documentation (to see if no issues araise)
- Deploy the Sphinx documentation (only on the main branch)
A workflow looks like this :
1
2
3
4
5
6
7
8
9
10
11
12
13
14
15
16
17
18
19
20
21
22
23
24
25
26
27
28
29
30
31
32
# .github/workflows/python_pytest.yml
# This workflow will run Python unit test with pytest.

name: Python Pytest

on:
  push:
  pull_request:


jobs:
  build:

    runs-on: ubuntu-latest

    strategy:
      matrix:
        python-version: ["3.11"]


    steps:
    - uses: actions/checkout@v3
    - name: Set Python $
      uses: actions/setup-python@v4
      with:
        python-version: $
        cache: 'pip'
        cache-dependency-path: backend/requirements.txt
    - run: pip install -r requirements.txt
      working-directory: './backend'
    - run: pytest
      working-directory: './backend'
A github workflow running pytest
Each workflow will build a docker image and run the scripts you told it to run. You can specify to run the worflow on certain branch (only main for example) and on certain actions (push, pull-request). Each time these conditions are met, github will run the workflows and signal you of the result of each one of them.
If all went good, you’ll get something like this :
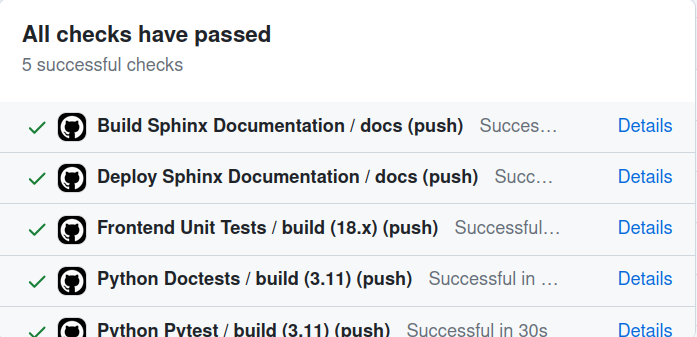 All tests passed, hurray!
However if something fails, you may get something like that : 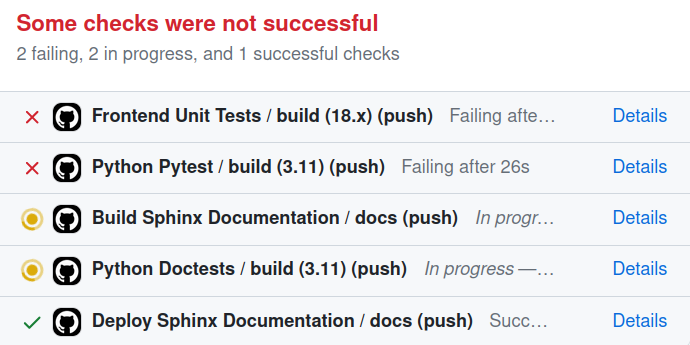 Oh no, something broke…
With this, you can ensure that everything works fine before you push to your deployment branch ! Speaking of deployment…
Deployment
Deployment is the part where make your work accessible to the world (ot at least a part of it) ! This is a crucial part, otherwise no one except you will be able to use your application.
For deployment I used Docker, which allows you to ship your application on any platform that can you Docker. For this, you need to write a small Dockerfile for both your backend and your frontend :
1
2
3
4
5
6
7
8
9
10
11
12
13
14
15
16
17
18
19
20
21
22
23
# backend/Dockerfile

# Base python package
FROM python:3.11.3-slim-buster

# Working directory
WORKDIR /app

# Copy the dependencies
COPY requirements.txt requirements.txt

# Install the dependencies
RUN pip3 install -r requirements.txt

# Copy the files
COPY . .

# Create logs file
RUN touch logs/app_logs.log

# Executable commands
CMD [ "python3", "app.py"]
Dockerfile for the backend
1
2
3
4
5
6
7
8
9
10
11
12
13
14
15
16
17
18
19
20
21
22
23
24
25
26
27
28
# frontend/Dockerfile

#Base image
FROM node:lts-alpine

#Install serve package
RUN npm i -g serve

# Set the working directory
WORKDIR /app

# Copy the package.json and package-lock.json
COPY package*.json ./

# install project dependencies
RUN npm install

# Copy the project files
COPY . .

# Build the project
RUN npm run build

# Expose a port
EXPOSE 5000

# Executables
CMD [ "npm", "run", "preview" ]
Dockerfile for the frontend
Now we can give these images to a web application host. I chose Render because it allows to host small web application entirely for free. Since I am using the free plan, my web application is automatically spun down after 15 minutes of inactivity. That is why there is a ~20s before the app is responding when you load it for the first time. Since I am using the free plan, I have access to very few CPU ressources which make the backend really slow…
On each push and merge on the production branch, Render will deploy anew the application. Since we tested on our main branch that our workflows run smoothly, we can ensure that the production branch (which only accepts merge from the main branch) will always be able to deploy on Render. Our CI/CD chain is complete !
End words
Thank you for reading this, I had a lot of fun making this project and I am looking forward to make new ones soon enough !Switzerland